Best Way to Watermark Photos for Your Blog
If you’re a pro-blogger, chances are you’re also an amateur photographer with great photos that you should consider watermarking. You go to events; you take a bucket full of pictures of last night’s lasagna (for me it was handmade perogies, heh;) your kids are uber cute and you need to get that one perfect moment for your blog; you have moments to share, but you also need to keep those moments safe from those who think that any image online is fair game. You also don’t have Getty Images’ funds for copyright technology and lawyer retainer fees, so right now you’re one true solution is watermarking. Watermarking isn’t actually a bad word, and the mere sound of this word shouldn’t be ulcer inducing. With the right tool, you don’t need to schedule hours upon hours to get your pics ready for your blog, because who has that kind of time these days? Keep reading and I’ll give you days back of your life so that you won’t be stuck renaming and watermarking that close up of gooey mozzarella cheese.
This Windows-only (sorry Mac users!) little-program-that-could has a multitude of fabulous functions to help better organize and prep your photos for your blog. Here are some key features:
- Batch Rename: Have a ton of photos on your phone from last night’s event? Drop them into FastStone Photo Resizer and change the names from IMG_573189.jpg into something that your inner SEO strategist will love, like “Most-Epic-Blogger-Event-of-the-Year-001.jpg”. Okay, so I would hope you would title the pictures better, but you get the jist, yeah? In a few minutes, your pictures will all have a shiny new name, perfect for Google Image Search.
- Batch Convert: This one is pure gold, and is where all the magic happens, like resizing and watermarking. I would hope that you are not posting your DSLR photos directly to your site, especially as they can be as large as 10MBs each depending on your capture settings (and if you are, please think of us poor souls who have limits on our bandwidth, especially when on mobile data plans.)
How to Use FastStone Photo Resizer

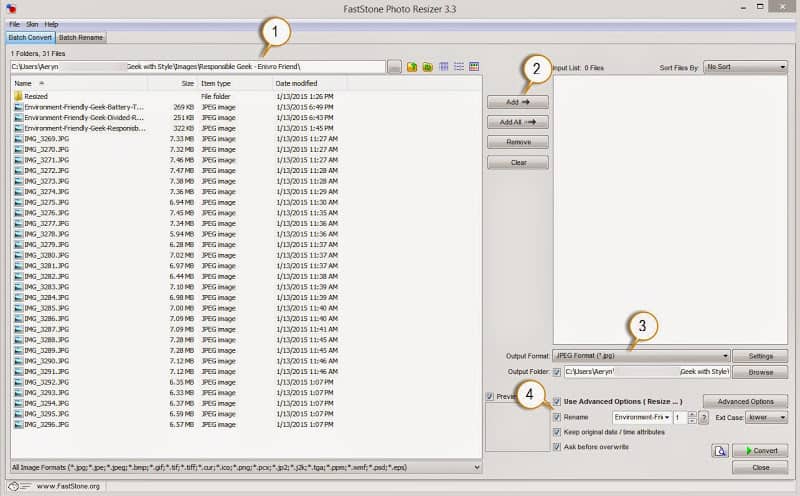
- Select the folder location of your images.
- Select the photos you wish to resize. If you wish to convert all photos within the folder, simply click the “Add All” button.
- Select the output format, usually you’ll want to stick with JPEG, if the photos are meant to share on your blog. Choose a folder for the resized photos to save into; you can use the same folder where the originals are saved or create a new folder like I have in the exampled titled “resized” for instance.
- Click on all of the options you wish to use for the conversion. You’ll definitely want to select Advanced Options to utilize various functions that make this batch convert awesome. You’ll also want to rename your photos to something worthy of your SEO prowess.
Advanced Options – Resize
The first screen to show, when you click on Advanced Options, is the resize tab. Go through the multitude of options available for converting the images to the size you want. Up to this point, I’ve used the “Resize based on one side” option, with width equalling exactly at 1200, and haven’t had any issue yet. When you have time though, test out what works best for you.


Advanced Options – Watermarking
This may be the best part of the photo resizer tool. Fast and easy watermarking. You can choose between a text watermark, an image watermark, or if you want to get really creative, you can even use both at the same time (utilize the Position and Offset options so that image and text don’t overlap, if that’s your thing.)
Creating a Text Watermark
A text watermark is truly simple. As the image shows below, type out the text you wish to use as your watermark, and if you really want to get crazy, click on the Font button to make changes to the style of your text.


Creating Your Watermark Image
I have a subscription to Adobe Illustrator, so I was able to create a watermark image pretty quickly that correlates to my website’s design. If you don’t have such tools at hand though, you can use a free image creator like PicMonkey to put one together quickly.

Affiliate Link
Quick and Dirty Instructions for Picmonkey Watermarking Image
- Start by clicking on the Design button, which will bring up a blank white canvas.
- Click on Crop button to resize the canvas to something smaller (350 x 100 is a good size to start with.)
- Fill the canvas with virtually whatever you please to create your watermark. Play around with the fonts for a fancy title, and overlays for flare. You might want to use the words “copyright” and “2015” (or whatever year it might be when you read this,) along with the name of your site or your own name or both. Just as long as you get the point across that you own that picture, the words used and design are up to you.
- If you want a transparent image (so that it doesn’t look like a boxed image on your photo,) change the canvas colour from white to transparent, which can be found in the Basic Edits tool bar.
- Save your photo to your desktop (.jpg for boxed image, .png for transparent image.) and then select that location where required in the photo resizer’s Watermark tab.
This is the image I created in Illustrator:

And these ones I bashed out in under a minute using Picmonkey:


Once you’re happy with all the adjustments you’ve made in the Advanced Options window, click the OK button to close that window, and then press the Convert button at the bottom right corner of the main window to make the magic happen.
Easy right??
If you’re a Mac user, I don’t have an option that’s just as easy for watermarking yet (if you know of a simple program, please share in the comments below!) I would encourage you to at least create at least one watermark image through Picmonkey to use if you do the alternate LONG method of watermarking with an image editor, such as Photoshop.
Side note – this program is free for non-commercial usage. If you’re not making money on your blog, then you don’t have to do a thing. If you do earn a living through your blog though, and find yourself using this program religiously in the near future, show FastStone some love by paying the $20 fee for commercial usage.

