10 Ways to Improve Your WordPress Blog In 30 Minutes
Our websites are ever-changing virtual extensions of ourselves. Sometimes it’s hard to keep up with all the ways you can make your blog easier to find through Google Search, or we might forget how to make it easy for our users to navigate to our latest list of posts. With those basic needs in mind, here is a list of 10 simple ways to improve your WordPress blog in 30 minutes.

10 Easy and Quick Ways to Improve Your WordPress Blog
Unintentionally, a good portion of these improvements requires the Yoast SEO plugin. I would suggest installing Yoast if you don’t have it yet, and/or become more acquainted with the features available to you.
EDIT: It’s come to my attention by a few that Yoast doesn’t automatically enable the editable features that I discuss below… I honestly don’t know if this is a new thing, or whether I simply turned on all the advanced features when I activated Yoast six years ago without much care to it. *shrugs*
So if you’re not seeing the Yoast features that I mention below, see if you have Advanced options toggled on/off. Go to Yoast SEO > Dashboard > scroll down to Advanced Settings, and click on Enable if it’s not already. Finally scroll all the way down that page, and click Save Settings to see the advanced options enabled.
1. Revisit your site’s Title and Meta descriptions.
If nothing else is done from this list of ways to spruce up your website, check and triple check that you’re fully satisfied with your site’s Title and Meta descriptions.
Meta Description
I once read that meta descriptions are “dead”, but they’re really not.
I was recently researching a number of websites for a specific niche, and omg *yawn*, some of the descriptions I’ve found were bland and did nothing at all to encourage me to click.
Laundry lists of what your site entails doesn’t work anymore (if it ever did). It might be time to add a little spice and emotion to your meta description copy, as your potential audience is using this text to decide on whether to click on your work or your competitor’s.
If you need examples of good and bad copy, go to Google and search your niche. I.e. “Foodie Bloggers”, “Dog Bloggers”, or go specific like, “Smartphone gadget bloggers”.
Title Meta
You can get away with a basic list of niche(s) for the title of your site, such as “Parenting, Foodie & Travel by Ms. Smith”.
This is the very first bit of text Google reads to find out what your site is about though, so make sure the right keywords are in there.
If you can specify a sub-niche, then make sure those particular keywords are added instead. Something like “Single Mom of Twins, Gluten Free Cooking & Travels with Kids” gets across three specific sub-niches that are favoured on Ms. Smith’s site. The audience that is looking for the best GF cookie recipe out there will know a great place to look now.
Check in with Moz’s SEO Title Tag checker to make sure your new title fits Google’s character limit.
If you have the Yoast SEO plugin installed, simply go to your backend dashboard, hover over the SEO link in your left-hand menu, and select “Titles & Metas” from the sub-menu. Finally, click on the Home tab, and make your site changes there.

2. Redirect image attachment pages to their corresponding posts, especially if they’re being indexed by Google.
Turns out, much like Pinterest, Google Image Search is a great place for readers to find your site. So, from what I can tell, having image attachment pages indexed in Google sounds like a great idea.
Image Attachment Page
With WordPress’ default settings, when people do find your site by the attachment page, there isn’t a whole lot of info on those pages to direct the reader to see the article that image is attached to. All they do see is the image sitting in its own page, with the image title.
Luckily, Yoast has a great workaround for this issue. One click of a button and your attachment pages are automatically redirected to the corresponding article.
YAY. Win-WIN.
First, make sure you’re allowing attachment posts to be indexed by Google et al. Go to Yoast (from your left-hand dashboard menu) > XML Sitemaps > Post Types, and ensure media will show up in your sitemap.

Next, click on Advanced and then in the tabs click on Permalinks.

And if your image isn’t attached to a post, you can either let that image URL not redirect at all, or easily attach the image to a post of your choosing.
Best way to ensure that the popular images that users are clicking on Google are attached to a post properly is to go into your analytics and check out what landing pages people are using to find your site. If you’re using Google Analytics, go to Behaviour > Landing Pages, and scan the list for any link that includes the word “attachment”.
For my own site, this attachment link was a big hit from Google Image Search for December 2017.
https://www.geeklife.ca/geek-culture/star-wars-the-last-jedi-pop-up-toronto/attachment/star-wars-the-last-jedi-t-shirts-toronto-pop-up/

So I needed to ensure that people wanting to view this image were seeing the whole post on the Jedi Pop-Up in Toronto, instead of the random image attachment page.
To make sure an image is attached, go into your Media page, search for the image, and then you can take note of whether the image is attached to a post or not. If not, click on the Attach link to bring up a window containing a list of your posts to choose from.

3. Remove the word “category” from your post URLs
If you look at one of your post URLs and don’t see the word “category” in the link, YAY.
If you see it – there is now a quick toggle button in the Yoast SEO plugin that will remove “category” from your post links if you wish. This function has an integrated redirect feature so that you won’t have to worry about your links suddenly being broken for Pinterest or Google.
You’ll find this button in Yoast’s Advance settings, right above the one for image attachment redirect in #2.
4. Spruce up your back-end user profile page and know how it affects your site.
There are settings in the profile area that could make or break your site with Google Search, and the Yoast plugin added a few more that you should take notice of.
For instance, I use my author page as my full article archive, since WordPress doesn’t seem to actually have one in any other way. See the link in that menu above (or on the side if you’re reading this on your phone/tablet) that says “ Blog“? That link sends my readers to my author page.
Edit Your Profile
I’m not sure what I was thinking in the past, but in Users > Your Profile under “Title to use for Author Page” in the Yoast SEO settings (you’ll need to scroll down a bit to see this part), I simply put down “Aeryn Lynne”.
Yes, please weep for my idiocy here.
If you went through option #1 above, you now know that titles are crucial for Google Search. It’s the first thing Google sees to determine what’s going on your page.
So for Google to see “Aeryn Lynne” as my lead keywords as to what’s going on in Geek with Style? Heartbreaking.
What did I change it to? I’m going to try “Technology, Travel & Geek Lifestyle Blog in Toronto by Aeryn Lynne” for now and see where that takes me.
Unlike “Aeryn Lynne”, this new title lists everything that I want to highlight as important keywords for my site.
BONUS Points: Scroll down a bit more in Your Profile to the “Author Archive Settings” and add a keyword friendly title to the “Custom Archive Headline”. The title for my list of blog posts on the author page is “Geek Lifestyle Blog: Technology & IoT, Travel & Pop Culture”, which has similar, but not exactly the same keywords as the Title for that page.
5. Is your blog really about you anymore?
Take a look at your front-end profile page (and sidebar.) Topics covered in your “About Me” will change over the years.
Do you list the ages of your kids as part of your site’s profile? They might be a year (or two) older now since you’ve last saved this info.
Have you recently changed your niche focus? If you first started out as a Foodie blogger, but have since moved on to focus only on a paleo diet, be sure that your “About Me” areas on your website reflect those changes.
6. Improve Your Posts’ Reach On Google Search
Quickly run through your site’s analytics to find up to four posts that you thought would be popular on Google, but aren’t meeting your expectations.
If you’re using Google Analytics, log into your account and then go to Behaviour > Site Content > All Pages. Scan through the list and pick a few posts that you feel should be doing better than they are in Google Search.
Go into the Edit panel for each post, scroll down to the Yoast box, and make changes to the SEO Title (click on the “Edit Snippet” button to see this text box.

Again, while Titles are generally ignored by users these days, it’s the first bit of introductory information that Google sees to determine what your blog post is about.
Create a short descriptive sentence of what the post is about, using specific keywords that you imagine your audience would use in Google Search to find your article. Hopefully, within a few days, Google will take note of the new changes to your post and re-index your article with the new set of keywords you’ve embedded.
7. Give Your Readers an Easy Way to Find All of Your Posts
Very few WordPress themes give you that old school front page that is simply a long list of your posts in descending order by the date they were published. We now rely on our readers to go through our sites by jumping from one category to another, which might not be how they roll. Make things easier for your readers to get a fuller picture of what you’re writing about now by showcasing your Author page in your primary menu.
You may have access to this by going to one of your blog posts and clicking on your name as the author. If that’s not possible, the link is simply yourwebsite.com/author/your-username
Add this link to your website’s menu (primary or secondary, up to you,) and title it as “Recent Posts”, “Recent Articles”, “Blog”, etc.
8. Tidy up your plugins list.
Take stock to see which activated plugins are actually needed anymore, and deactivate/delete any that aren’t. If you have any plugins that are not activated within your list, you’re better off deleting them altogether.
Even if the plugin isn’t active on your site, there is always a chance of a hacker utilizing that plugin to access your site. Especially old plugins that haven’t been updated in years.
9. Make your site less heavy for your users’ wifi by automatically optimizing your images.
It’s a frustrating thing, but not everyone has access to high-speed internet connections. Because of this, large image file sizes can make or break a site, especially if Google is watching (Google is always watching.)
Use a plugin like ShortPixel (aff link) to automatically reduce the file size of your photos (not to be confused with a photo’s size dimensions, that’s a different thing).
There’s a free version of ShortPixel that will optimize 150 images/month for you.
If your site has a massive amount of images to optimize, consider purchasing a one-time addon for $20 a few months from now. Thanks to the one-time addon, I’ve nearly optimized 15,000 images so far.
10. The most successful blogs utilize an editorial calendar.
Write down a list of the next five topics you want to cover on your blog. Now that your website has been optimized for the new year, it’s time to start adding great content!
Other Tasks to Improve Your Site
Here are some additional quick tasks to consider that can always be spruced up a bit.
- How is your site menu? Is there too much happening on the main menu? Can you shift some links to a submenu? Or a secondary one instead?
- Make sure that your users/clients can easily contact you. Don’t make your audience search high and low for your email or contact form.
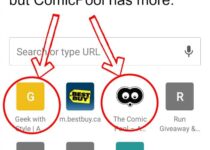
- Also, make sure your audience doesn’t have to search high and low for your search box. Make it the first thing anyone sees in your sidebar.
Is it Time to Move to a New Host?
If your site is slow, if you’ve experienced the white-screen of blogging death from “using too many resources”, if you’ve been hacked, or if you’re simply not at all happy with your current host, I highly recommend moving your blog to SiteGround. (aff link)
From over ten years experience of trying out a boat-load of hosts, SiteGround is hands-down, the best web host out there.
SiteGround does the move for you, so you don’t have to worry about how to move everything over yourself. And they do the job beautifully. I have moved most of my personal web management clients to SiteGround, and not once was the transfer done poorly.
You’ll experience faster speed with their HTTP/2 server, and cache plugin.
Free HTTPS SSL certificate that is easily added with a click of a button.
You’ll have *daily* backups done freely, and have access to the past 30 days of backup files to choose from should you ever need to restore your site.
You’ll have impeccable support that will help you when WordPress has you confused. If your site seems to be crashing frequently for no reason you can understand, they will figure it out for you.

How to Get Your Site’s Logo on Absolutely Everything with New Favicon Code

Best Way to Watermark Photos for Your Blog
